Installing Jekyll on windows 8.1
Table of Contents
![]()
Jekyll is an static site generator designed for static websites and blogs. In this post, I enumerate the process of installing Jekyll on Windows 8.1.
On previous ocassions, my posts (though rare) have been dynamic and created using blogging platforms which make writing blog posts a very easy process. Unfortunately I never kept pace with the updates on these platforms and one day I woke up to find my site had been hacked. I panicked and decided to take down the site instead of trying to figure out what evil code had been injected into the site.
After the experience, I realized that disadvantages of using third party blogging platforms outweighed the advantages. Most blogging platforms rely on plugins and some plugins are not updated regularly. Yes, the plugins/modules were simplifying my work but none was available that did not have some open issues or minor bugs. Any plugin I added was only increasing the surface area for security attacks. I therefore decided to seek for a safer option that would require minimal updating.
Jekyll stores content locally in simple markdown text files which can be edited using any text editor. This makes versioning possible for the changes that I make to these files. By using simple text files, and letting Jekyll generate static sites from them, my maintenance requirements are totally minimized. I have no server-side language or databases to worry about. No XSS or sql injection to look out for. I may not be totally safe from those bad elements but at least I have minimized the surface area for attacks.
One of the powerful features of blogging platforms is their commenting systems. With Jekyll, your options are limited to either totally forgoing comments, using third party commenting services like Disqus, using social networking services like twitter, using a special per-post e-mail address to receive comments or incorporating a static comments plugin. If I was to make a choice, I would pick among the last three. But for now I will just forgo comments.
-
Install Ruby
- Download RubyInstaller for windows. I am using an x64 computer so I download rubyinstaller-2.1.5-x64 which is the latest x64 version.
- After the downloadd completes, I start the installer and click
OKto accept English as the default setup language - Accept license and clicked
Next> - Modified suggested folder from
C:\Ruby21-x64toC:\Ruby2-x64. - Checked
Add Ruby executables to your PATHandAssociate .rb and .rbw files with this Ruby installationand clickInstallbutton - Click
Finishafter installation is complete
-
Install Ruby DevKit
-
Download version which corresponds to installed rubyinstaller
DevKit-mingw64-64-4.7.2-20130224-1432-sfx.exe -
Extract files to a folder of your choice. I opt for
C:\RubyDevKit\ -
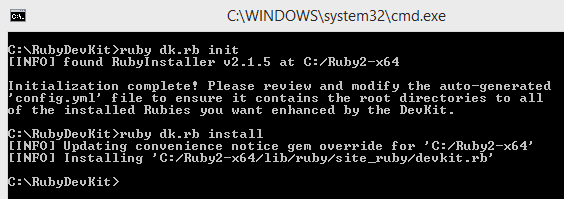
Initialize the DevKit and bind it to Ruby installation
- Start up windows command prompt
- Change directory to your DevKit folder.
C:\RubyDevKit\ - Auto-detect Ruby installations and installations to a configuration file by executing the following command
ruby dk.rb init
This createsconfig.ymlfile and adds a line on Ruby installation location.- C:/Ruby2-x64 - Install DevKit binding to Ruby installation by running ruby
dk.rb install
-
-
Install the Jekyll Gem
RubyGems is a packaging system that makes it simple to install Ruby libraries and Jekyll comes as a Ruby Gem-
In the command prompt run the following command
gem install jekyll -
Pressing the
Entergives the following errorERROR: Could not find a valid gem 'jekyll' (>= 0), here is why: Unable to download data from https://rubygems.org/ - SSL_connect returned=1 errno=0 state=SSLv3 read server certificate B: certificate verify failed (https://api.rubygems.org/latest_specs.4.8.gz)
-
A bit of searching reveals the problem is documented.
-
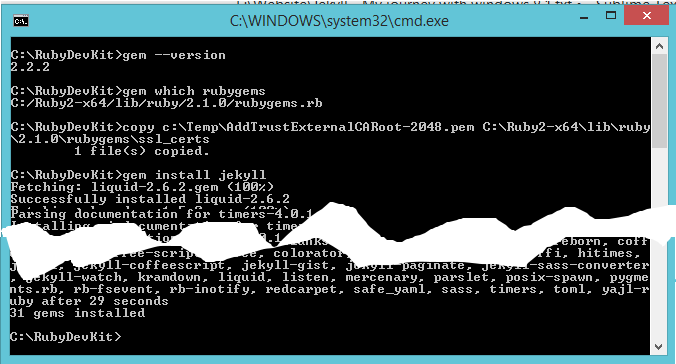
I need to install using updated RubyGems. So in the command prompt type command to check for version
gem --versionThis displays I am having version 2.2.2
-
Add new ssl certificate to currently existing certificates
-
Download new ssl certificate making sure file is saved with
.pemextension -
Locate RubyGems ssl certificate directory for current installation using the following command in the command prompt
gem which rubygemsThis displays `C:/Ruby2-x64/lib/ruby/2.1.0/rubygems.rb` -
Copy downloaded certificate to
C:\Ruby2-x64\lib\ruby\2.1.0\rubygems\ssl_certsfoldercopy c:\Temp\AddTrustExternalCARoot-2048.pem C:\Ruby2-x64\lib\ruby\2.1.0\rubygems\ssl_certs
-
-
Re-run command to install jekyll
gem install jekyll -
And everything now runs smoothly
-
-
-
Install a code snippet syntax highlighter
You have an option between Pygments which requires installation of Python and Rouge which is purely written in pure Ruby. I opt for Rouge.
- Run the following command in the command prompt
gem install rouge - Set Rouge as the syntax highlighter
- Navigate to DevKit root folder
- Open
_config.yml - Add the following text
highlighter: rouge
- Run the following command in the command prompt
-
Add source folder changes watch
-
Run the following commands in the command prompt
gem install wdm
-
-
Type the following command to update installed gems
gem updateDuring update, some gems may have conflicts with locally existing gems and you may be requested to overwrite the executables. Always confirm by typing
yto overwrite. -
Generating a new Jekyll site
-
Open the command prompt
-
Type the following command and press the enter key
jekyll new <sitename>Replace
<sitename>with your site name. Therefore for this site I will issue the commandjekyll new site callmekags.co.keThis will create a folder at the current location with a name of your
<sitename> -
Open
_config.ymlunder root of your site and add the following texthighlighter: rouge
-
-
Testing the new site
-
Navigate to the root of the site folder
-
type
jekyll serve <newsite>and pressEnter
-
In your web browser, navigate to
localhost:4000and you should now see default website generated by Jekyll.
-
-
After the build process, Jekyll creates a
_sitesfolder. All that you have to do is to copy all files in_sitesfolder to your web server.
References:
Run Jekyll on Windows